|
Plain English Explanation
|
Technical Definition
|
Intuitive Feeling
|
|
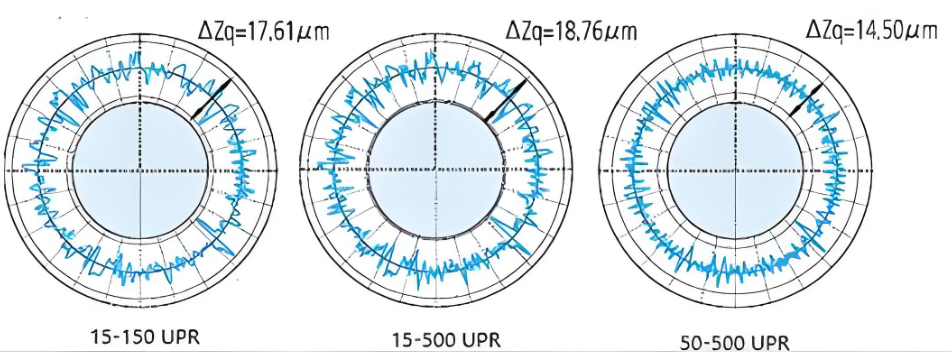
You think you turned a perfect “circle,” but it ends up an “ellipse,” “triangular prism,” or “wave shape” — the main culprit behind customer rejections and boss scoldings!
|
The degree of deviation of the actual contour of a workpiece’s cross-section from an ideal circle, clearly specified in GB/T 1182-2008 (Chinese National Standard)
|
Feels “bumpy” when touched by hand; caliper measurements show absurdly large diameter differences (e.g., over 0.02mm)
|
|
Measurement Method
|
Tools
|
Operation Difficulty
|
Measurement Accuracy
|
Application Scenarios
|
Newbie Rants
|
|
Multi-point Measurement with Caliper/Micrometer
|
Digital caliper, Outside micrometer
|
⭐️ (Easiest)
|
⭐️⭐️ (±0.01mm)
|
Rapid spot checks, parts with low precision requirements
|
“I measured 8 points and got 8 different numbers! Which one is correct?” “Thought measuring twice was enough, but the customer accused me of faking data!”
|
|
Measurement with Dial Indicator + V-Block
|
Dial indicator, Magnetic base, V-block
|
⭐️⭐️ (Moderate)
|
⭐️⭐️⭐️ (±0.005mm)
|
Workshop batch inspection, small-to-medium sized workpieces
|
“A tilted V-block = wasted measurement!” “My hand shook while rotating the workpiece, and the data went haywire!” “The indicator needle keeps jumping — my eyes are strained and I still can’t get an accurate reading!”
|
|
Roundness Tester Measurement
|
Bench-top roundness tester, Portable roundness tester
|
⭐️⭐️⭐️ (Challenging)
|
⭐️⭐️⭐️⭐️ (±0.0005mm)
|
High-precision parts, orders with strict customer requirements
|
“The machine is so expensive I’m afraid to touch it — the boss watches me operate it!” “I don’t understand the software parameters, and the report is full of curves I can’t analyze!” “Calibration takes half a day — impossible for rush orders!”
|
Step-by-Step Operation
- Place the V-block on a flat workbench, then set the workpiece on the V-block (ensure the cylindrical surface fits the V-groove)
- Secure the dial indicator to the magnetic base, align the indicator needle vertically with the workpiece’s outer circle (light contact, preload 0.1-0.2mm)
- Slowly and evenly rotate the workpiece one full circle by hand (don’t scratch the base! Don’t shake!)
- Record the maximum and minimum readings from the dial indicator — the difference = circularity error (e.g., max 0.012mm, min 0.003mm, error = 0.009mm)
- Measure 2 more times on 2 different cross-sections and take the maximum value (to avoid local errors)
|
Error Phenomenon
|
Typical Causes (Newbie High-Frequency Mistakes)
|
Solutions
|
Pitfall-Avoidance Rhyme
|
|
Ellipse (Large Diameter Difference)
|
1. Over-clamping the workpiece, causing deformation2. Spindle runout exceeding limits3. Tool tip wear
|
1. Use soft rubber pads when clamping, apply moderate force (don’t tighten like crazy!)2. Ask a technician to calibrate the spindle3. Replace the tool or regrind the tip
|
Don’t clamp too tight; calibrate spindle first; keep tool tip sharp
|
|
Polygonal Shape (Angular Feel)
|
1. Tool vibration (spindle speed too fast/slow)2. Unreasonable feed rate3. Workpiece not clamped tightly, slipping during rotation
|
1. Adjust spindle speed (refer to machine recommended parameters)2. Reduce feed rate (e.g., from 0.2mm/r to 0.1mm/r)3. Inspect chuck jaws, clean chips before clamping
|
Speed must be right; feed not too hasty; clamp to prevent slipping
|
|
Wave Shape (Uneven Surface)
|
1. Poor tool rigidity (e.g., slender tool shank)2. Cutting fluid not reaching the tool tip3. Uneven workbench
|
1. Replace with a thicker tool shank, shorten tool overhang2. Adjust cutting fluid direction to ensure proper cooling3. Ask a technician to level the workbench
|
Tool shank must be thick; cooling must be sufficient; table must be flat
|
|
Fluctuating Measurement Data
|
1. Workpiece not stabilized during measurement2. Dial indicator not secured tightly3. Accidentally touching the indicator needle
|
1. Clean the workpiece base, place stably on the V-block2. Tighten the magnetic base, don’t touch the table3. Only touch the workpiece when rotating, keep away from the base
|
Workpiece stable; base tightened; hands off the needle
|
👉 Top 5 Mistakes Newbies Make (Save 3 Years of Detours After Reading)
- Drawing conclusions from measuring only one cross-section: “Thought measuring one circle was enough, but the customer failed other cross-sections during sampling!” — Measure at least 3 cross-sections!
- Measuring immediately after clamping: “Measured right after clamping, data looked good, but it changed after removal!” — Clamping force deforms the workpiece; wait 5 minutes for cooling before measuring!
- Ignoring temperature effects: “Qualified in summer, but customer said it exceeded tolerance in winter!” — Metal expands with heat and contracts with cold; measure in an environment around 20℃ if possible!
- Using calipers instead of a dial indicator: “Caliper showed similar diameters, but the customer’s roundness tester said it was out of tolerance!” — Calipers measure diameter, not circularity!
- Not cleaning chips: “Didn’t clean chips, measured error of 0.05mm!” — Must wipe clean the workpiece surface and V-block before measurement!
👉 Quick Check for Reliable Data
- Measure the same cross-section 3 times; if the error difference is within 0.002mm — data is reliable
- Sudden error increase when changing cross-sections — most likely local workpiece deformation or incorrect measurement position
- Dial indicator needle jumping randomly — either the tool is broken or the workpiece is unstable; recheck immediately!
|
Knowledge Point
|
Plain English Explanation
|
Key Information
|
|
Circularity Tolerance
|
The “allowable error range” required by the customer (e.g., for a φ50h7 shaft, the circularity tolerance may be 0.008mm)
|
Check the drawing specifications! Don’t guess randomly!
|
|
Measurement Datum
|
Based on the workpiece’s central axis (so the V-block must be aligned to keep the axis horizontal)
|
Wrong datum = useless measurement!
|
|
Precision Grades
|
Ordinary machining: Circularity error ≤0.01mmPrecision machining: ≤0.005mmUltra-precision: ≤0.001mm
|
Follow customer requirements; don’t pursue excessive precision unnecessarily (wastes time and money)
|
|
Common Standards
|
GB/T 1182-2008 (Chinese National Standard), ISO 12781 (International Standard)
|
Just know these standards exist when the customer asks!
|
- Choose the right measuring tool (use a dial indicator for low requirements, a roundness tester for high precision)
- Avoid pitfalls during operation (standardize clamping, cleaning, and rotation)
- Understand error causes (prevention is 10 times better than remediation after the fact)
All experimental data presented in this paper are derived from controlled production environments and standardized test procedures. However, due to differences in equipment models, material batches, and on-site operating conditions, readers are advised to verify and adjust technical parameters according to their specific application scenarios before practical implementation.
The research results and technical insights shared herein are based on the author’s professional experience and experimental observations. The author and the affiliated institution shall not be liable for any direct, indirect, or consequential damages (including but not limited to equipment damage, product quality issues, or production losses) arising from the improper use of the information provided in this paper.

