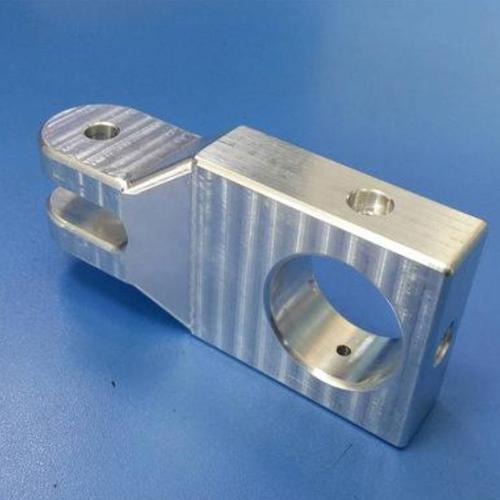
In fields such as automotive lightweight design, precision manufacturing of consumer electronics, and aerospace structural components, aluminum alloy has become a key material due to its characteristics of low density, high strength, and easy processing. However, when dealing with customized aluminum alloy parts, traditional processing methods often encounter problems such as low dimensional accuracy (tolerance exceeding ±0.05mm), poor surface quality, and insufficient processing efficiency. The CNC processing service for customized aluminum alloy parts, relying on high – precision equipment, special processing techniques, and full – process quality control, can control the dimensional tolerance within ±0.01mm and the surface roughness Ra≤0.8μm, providing efficient and accurate customized aluminum alloy processing solutions for various industries.
I. Why Can’t Traditional Processing Meet the Requirements of Customized Aluminum Alloy Parts?
Q&A: What are the core advantages of the CNC processing service for customized aluminum alloy parts?
When processing customized aluminum alloy parts (such as grades 6061 and 7075), traditional processing has three core pain points:
Difficulty in ensuring accuracy: Aluminum alloy has low hardness and high plasticity. Traditional machine tool processing is prone to chatter and deformation. After ordinary processing, the dimensional tolerance often reaches ±0.05mm, which cannot meet the requirements of precision assembly (such as the tolerance of electronic device housings is ±0.02mm).
Surface quality defects: During the cutting process, aluminum alloy is prone to sticking to the tool, resulting in problems such as scratches, burrs, and tool marks on the surface. The Ra value of the surface roughness is usually above 3.2μm, requiring additional polishing treatment, which increases processing costs and time.
Limited processing of complex structures: For complex designs such as thin – walled parts (wall thickness ≤ 0.5mm), deep cavities, and micro – structures (aperture ≤ 0.3mm), traditional processing requires multiple clamping and sequential processing, which is inefficient and prone to cumulative errors. The scrap rate is as high as 15% – 20%.
The CNC processing service for customized aluminum alloy parts takes “high precision, high quality, and high efficiency” as its core:
Full – process precise control: High – precision CNC machining centers (positioning accuracy ±0.003mm, repeat positioning accuracy ±0.001mm) are used, combined with special tools and optimized processes to control the dimensional tolerance within ±0.01mm. Through high – speed milling and intelligent cooling technology, the surface roughness Ra is reduced to 0.8μm, reducing post – processing procedures.
Flexible customized production: Based on the customer’s 3D model data, processing codes are quickly generated, supporting multi – variety and small – batch customization. The cycle from order confirmation to the delivery of the first piece is shortened by 60%, helping enterprises quickly respond to market demands.
II. How Does the Core Process of CNC Processing of Customized Aluminum Alloy Parts Achieve Breakthroughs?
Innovation of Special Equipment and Tools
High – performance processing equipment: Five – axis high – speed machining centers (spindle speed 24,000 – 40,000rpm) are equipped, driven by linear motors (rapid traverse speed 60m/min), with a positioning accuracy of ±0.003mm and a repeat positioning accuracy of ±0.001mm. They can achieve one – step forming of complex curved surfaces, avoiding multiple clamping errors.
Special tool materials: Diamond – coated tools and PCD (polycrystalline diamond) tools are used, with an edge radius < 0.01mm, reducing the cutting force by 30% and effectively suppressing the sticking of aluminum alloy to the tool. The surface is coated with a TiAlN nano – coating (thickness 1 – 2μm), increasing the wear resistance by 5 times, raising the cutting speed to 500m/min, and extending the tool life to more than 10 hours.
Tool geometry optimization: Tools with a large rake angle (12° – 15°) and a large helix angle (35° – 40°) are designed to improve chip removal performance. For the processing of thin – walled parts, corrugated – edge milling cutters are used to reduce cutting vibration and improve processing stability.
Advanced Processing Technologies
High – speed milling technology: A processing strategy of high spindle speed (15,000 – 40,000rpm) and small cutting depth (0.1 – 0.5mm) is adopted to reduce the accumulation of cutting heat, achieving high – precision processing of aluminum alloy thin – walled parts (0.3mm). At the same time, the surface finish is improved, and the processing efficiency is increased by 60%.
Minimum quantity lubrication (MQL) at low temperature: – 20℃ low – temperature cold air and a small amount of vegetable oil (0.05 – 0.1ml/min) are used for composite cooling and lubrication, reducing the temperature in the cutting area by 30% – 40%, reducing the adhesion between the tool and the workpiece, extending the tool life by 50%, and reducing the surface residual stress by 40%.
Micro – milling processing: For small parts (size < 10mm) and micro – structures (groove width 0.05mm, depth – to – width ratio 10:1), micro – milling equipment with a micron – level resolution (0.1μm) is used, combined with a microscopic vision system to achieve nanometer – level processing accuracy, meeting the precision requirements of industries such as semiconductors and watches.
Digital Processing Control System
Processing simulation and optimization: Software such as VERICUT and UG NX is used to simulate the aluminum alloy cutting process, predict the distribution of cutting force, cutting heat, and tool interference, optimize the tool path and cutting parameters, reducing the number of trial cuts by 90% and avoiding material waste and tool damage.
Intelligent parameter adjustment: More than 50 parameters such as spindle power, cutting force (accuracy ±1N), and tool vibration (resolution 0.1μm) are collected in real – time. An AI algorithm automatically adjusts the feed rate and cutting depth to compensate for tool wear and material hardness fluctuations. The product qualification rate is increased from 82% to 96%.
Digital twin monitoring: A digital twin model is created for each processing project to track the processing progress, equipment status, and quality data in real – time, predict the trend of processing errors, and adjust the process in advance to achieve preventive maintenance, reducing unplanned downtime by 40%.
III. Quality Control: Stringent Verification from Material to Finished Product
Multi – dimensional Performance Testing System
Dimensional inspection: A coordinate measuring machine (accuracy ±0.003mm) and an articulated arm measuring machine are used to detect the key dimensions and geometric tolerances (roundness ≤ 0.005mm, parallelism ≤ 0.01mm) of the parts. For small apertures, an image measuring instrument (accuracy ±0.001mm) is used for high – precision detection.
Surface quality: A microscope (magnification 500 times) is used to detect surface scratches and burrs, and a white – light interferometer is used to measure the surface roughness to ensure that there are no defects affecting assembly and use, and the surface roughness Ra≤0.8μm.
Function testing: Fatigue tests (no fracture after 10⁶ cycles) are carried out on automotive parts, and drop tests (free – fall from a height of 1.2m) are carried out on the housings of electronic devices to verify the actual use performance.
Composition analysis: The chemical composition of aluminum alloy materials is detected by a spectrometer to ensure that the contents of elements such as Si, Mg, and Cu meet the standards of ASTM B221 and GB/T 3190, and the impurity content (such as Fe≤0.7%) is up to standard.
Mechanical properties: A universal material testing machine is used to test the tensile strength (≥205MPa), yield strength (≥110MPa), elongation (≥12%), and a hardness tester is used to measure the Vickers hardness (≥10HW) to ensure that the material properties meet the design requirements.
Metallographic inspection: The microstructure of the material is observed to ensure that the grain size is uniform (grain size ≥ 7 grades) and there are no segregation, inclusions, and other defects, ensuring the internal quality of the material.
Material – level screening:
Finished – product – level testing:
Intelligent Defect Prevention Technology
The system of twelve inspections for the first piece: The engineer team strictly inspects 40 indicators of the first – piece parts, such as material batches, tool parameters, and processing dimensions, to intercept potential defects.
Real – time process monitoring: Through the tool wear monitoring system (resolution 0.001mm) and vibration sensors, abnormalities such as tool breakage and cutting chatter are warned in real – time, and the machine stops automatically and the tool is replaced to prevent batch defects.
IV. How Does Customized Aluminum Alloy Processing Balance Efficiency and Cost?
Q&A: Does high – precision customized processing mean high cost and low efficiency?
Through three innovative models, the CNC processing of customized aluminum alloy parts reduces costs by 30% – 40% and increases efficiency by 50%:
Tool life management: An intelligent tool management system is adopted to monitor the tool wear state in real – time, predict the tool life (error < 5%), and replace the tool in advance, reducing downtime by 20% and tool costs by 35%.
Process integration and optimization: Multiple processes such as milling, drilling, boring, and tapping are integrated on one device, reducing the number of clamping times, increasing the processing efficiency by 40%, and reducing equipment and labor costs.
Digital collaborative production: The MES system integrates data such as orders, processes, equipment, and materials to realize automatic production planning scheduling. The equipment utilization rate is increased from 60% to 85%, further reducing costs.
V. Core Considerations for Choosing CNC Processing Services for Customized Aluminum Alloy Parts
Equipment and technical strength: The supplier should have advanced equipment such as five – axis high – speed machining centers and micro – milling equipment, as well as core technologies such as the application of diamond tools and minimum quantity lubrication at low temperature.
Industry certification qualifications: It should have certifications such as ISO 9001, IATF 16949 (automotive industry), and ISO 13485 (medical industry), as well as third – party test reports to ensure that products meet industry standards.
Digital service capabilities: It should have digital tools such as CAM programming, processing simulation, and MES systems to achieve full – process data – driven and ensure efficient and controllable processing.
Conclusion
The CNC processing service for customized aluminum alloy parts is based on advanced equipment and driven by digital technology, breaking through the limitations of traditional processing, and providing high – precision and high – efficiency customized parts manufacturing solutions for industries such as automotive, electronics, and aerospace. In the trend of the transformation of the manufacturing industry towards intelligence and precision, processing services with “advanced equipment + digital processes + full – chain quality control” are becoming the key support for enterprises to enhance their competitiveness and achieve innovative development. From automotive lightweight components to precision electronic housings, the customized aluminum alloy CNC processing service will continue to help every design idea land efficiently with excellent precision and efficiency, promoting the high – quality development of the manufacturing industry.
(Contact us immediately to obtain a customized CNC processing solution for aluminum alloy parts and a free process evaluation service)

