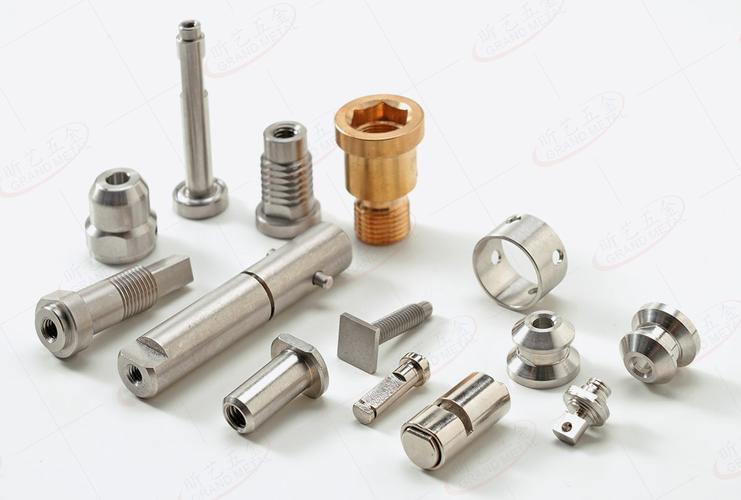
Core Cognition: What Is CNC Part Polishing, and Why It Matters
CNC part polishing isn’t just “buffing out scratches”—it’s a precision craft that refines CNC-machined parts to meet strict functional, aesthetic, and regulatory standards. Unlike manual polishing (which risks altering dimensions), CNC part polishing is controlled, repeatable, and tailored to the part’s purpose: it removes tool marks, reduces surface roughness (Ra), and enhances performance—without compromising the CNC-machined precision (±0.005mm or tighter).
Why does it matter? Consider these critical use cases:
- A medical hip implant needs an Ra ≤ 0.02μm surface to avoid irritating bone and tissue (roughness causes inflammation).
- An automotive engine piston requires an Ra ≤ 0.2μm finish to reduce friction (saving fuel and extending engine life).
- An aerospace turbine blade needs a smooth leading edge (Ra ≤ 0.1μm) to minimize air resistance (critical for fuel efficiency at 30,000ft).
Industry data proves its significance: 68% of CNC-machined parts in medical, automotive, and aerospace sectors need post-machining polishing (2025 CNC Surface Finishing Report). Polishing reveals a part’s true worth—it enhances performance, durability, and user trust, whether for a surgeon, driver, or pilot.
Core CNC Part Polishing Techniques: Methods, Materials, and Craftsman Insights
No single polishing method works for all parts—your choice depends on the material (aluminum, titanium, steel), desired Ra value, and part complexity (simple shafts vs. intricate medical implants). Below are the four most common techniques, with real-world application stories.
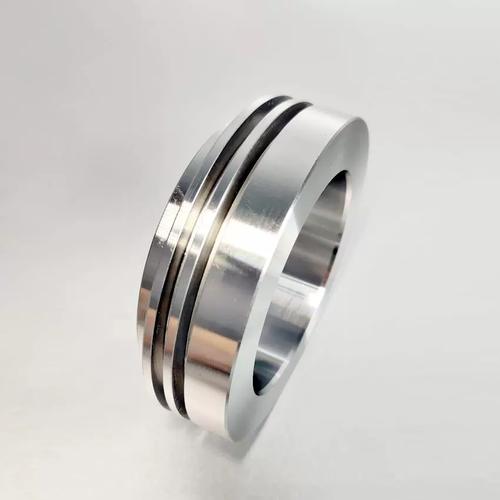
1. Mechanical Polishing (The “Workhorse” for Aesthetics)
- Core Principle: Uses rotating abrasive tools (sandpaper, 砂轮 (grinding wheels), 布轮 (buffing wheels)) to physically remove surface material—starting with coarse grits (80-240) to erase tool marks, then fine grits (400-10,000) to achieve a smooth finish.
- Key Tools:
-
- Sanding belts (for flat parts like EV battery trays).
-
- Flap wheels (for curved parts like automotive mirror bases).
-
- Wool buffing wheels + polishing compounds (alumina for steel, cerium oxide for glass-like aluminum finishes).
- Best For: Aluminum (6061/7075), steel (304/4140), and parts needing a decorative finish (e.g., consumer electronics housings).
- Craftsman’s Insight: “I once polished 500 aluminum EV charging port brackets. I started with 120-grit sandpaper to remove CNC mill marks, then stepped up to 400, 800, and finally 1500-grit. For the final shine, I used a wool wheel with white polishing compound (alumina). The client said the brackets ‘looked like chrome’—but they were lightweight aluminum. The key is patience: skip a grit, and you’ll leave scratches.”
- Pro Tip: Keep the tool moving—stopping in one spot causes “burn marks” (discolored spots on steel) or “dishing” (low spots on aluminum). For steel, use a coolant mist to prevent overheating.
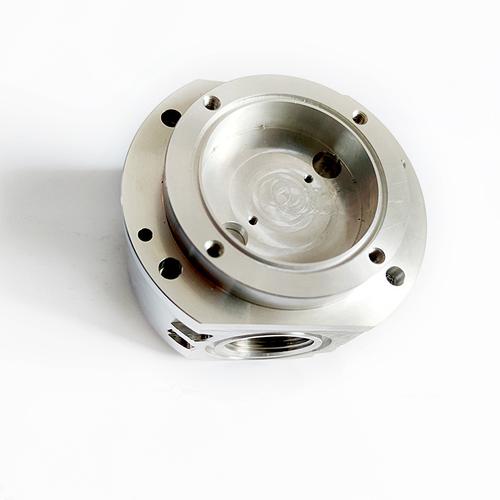
2. Electrolytic Polishing (The “Precision Choice” for Medical/Aerospace)
- Core Principle: An electrochemical process where the CNC part acts as the anode in a chemical bath. Electric current dissolves microscopic peaks on the surface (from CNC machining), leaving a smooth, uniform finish—no physical contact, so no risk of altering dimensions.
- Key Setup: A bath of phosphoric/sulfuric acid (for steel/titanium), DC power supply (10-20V), and a cathode (stainless steel). The part is submerged, and current is applied for 5-15 minutes.
- Best For: Stainless steel (medical tools), titanium (implants), and parts with complex geometries (e.g., surgical robot jaws with internal cavities).
- Data Impact: Electrolytic polishing can reduce Ra from 1.6μm (post-CNC) to 0.02μm—critical for medical parts (Source: Medical Device Manufacturing Guide 2025).
- Craftsman’s Insight: “We polish titanium hip implants with electrolytic polishing. CNC machining leaves a Ra 0.8μm surface—too rough for bone integration. After 10 minutes in the acid bath, Ra drops to 0.01μm. The best part? It reaches every nook—even the porous surface of the implant’s stem, which mechanical polishing can’t touch. Just wear proper PPE (acid-resistant gloves, goggles)—this stuff is corrosive!”
3. Ultrasonic Polishing (The “Solution for Complex Cavities”)
- Core Principle: Uses high-frequency sound waves (20-40kHz) to vibrate an abrasive slurry (diamond powder + oil) against the CNC part’s surface. The vibrations dislodge microscopic tool marks—even in tight spaces like blind holes, slots, or internal grooves (where mechanical tools can’t reach).
- Key Tools: Ultrasonic generator, vibrating tool head (tungsten carbide), and abrasive slurry (grit size 0.5-10μm, depending on desired Ra).
- Best For: Hard materials (tungsten, Inconel), parts with intricate features (e.g., aerospace turbine blade cooling channels), and mold components (e.g., plastic injection mold cavities).
- Real-World Example: Last year, we polished Inconel aerospace fasteners with a 2mm blind hole. Mechanical polishing couldn’t reach the hole’s bottom—ultrasonic polishing did it in 8 minutes, reducing Ra from 1.2μm to 0.1μm. The fasteners passed NASA’s airtightness test on the first try.
- Craftsman’s Insight: “Control the vibration amplitude—too high, and you’ll scratch the part; too low, and it takes forever. For the Inconel fasteners, we set it to 30μm amplitude and used 1μm diamond slurry. Start with a coarser slurry (5μm) to remove tool marks, then switch to fine (1μm) for the finish. Patience pays off—this method is slow, but it’s the only way to polish complex parts without breaking them.”
4. Chemical Polishing (The “Fast, Low-Cost Option for Plastics/Soft Metals”)
- Core Principle: A chemical bath (no electricity) that dissolves the outer layer of the part—smoothing tool marks by etching the surface. It’s less precise than electrolytic polishing but faster and cheaper, making it ideal for non-critical parts.
- Key Baths:
-
- For aluminum: Phosphoric acid + nitric acid (removes oxidation and tool marks).
-
- For plastics (ABS/PEEK): Acetone + alcohol (softens the surface, reducing roughness).
- Best For: Aluminum prototypes, plastic medical device housings, and low-volume parts where speed matters more than ultra-tight Ra.
- Craftsman’s Insight: “We use chemical polishing for ABS sensor housings—CNC routing leaves a Ra 3.2μm surface. A 2-minute dip in acetone/alcohol brings it to Ra 0.8μm. It’s not as smooth as mechanical polishing, but it’s fast (we do 100 housings at once) and cheap. Just don’t leave parts in too long—acetone will warp ABS if you exceed 5 minutes!”
Key Steps for CNC Part Polishing: From Prepping to QA
Polishing a CNC part isn’t random—it’s a linear process that preserves precision while enhancing surface quality. Skip a step, and you’ll end up with a scratched, dimensionally off part.
Step 1: Prepolish Preparation (Clean + Inspect)
- Clean the Part: Remove CNC machining oils, chips, and debris with isopropyl alcohol (for metals) or mild soap (for plastics). Dirty parts trap grit, which causes scratches during polishing.
-
- Example: I once skipped cleaning an aluminum bracket—CNC oil mixed with polishing compound, leaving streaks. Had to start over. Now, I ultrasonic-clean all parts first (5 minutes in soapy water, then rinse).
- Inspect Dimensions: Use a micrometer or CMM to record the part’s post-CNC dimensions. Polishing removes 0.001-0.01mm of material—you need a baseline to avoid over-polishing (e.g., a 10mm-thick part should not drop below 9.99mm after polishing).
- Mark Critical Areas: Use a marker to highlight “no-polish” zones (e.g., a threaded hole that needs to stay within tolerance). I once polished over a threaded hole—ruined the threads. Now, I cover threads with tape before starting.
Step 2: Choose the Right Technique (Match to Part + Goal)
- Ask three questions to pick the best method:
-
- Material? Aluminum → mechanical; titanium → electrolytic; plastic → chemical.
-
- Complexity? Simple flat part → mechanical; part with holes → ultrasonic.
-
- Ra Requirement? Ra ≤ 0.02μm → electrolytic; Ra ≤ 0.8μm → mechanical.
- Example: A stainless steel medical tool with a Ra requirement of 0.05μm and no complex features → electrolytic polishing (fast, precise).
Step 3: Stepwise Polishing (Coarse → Fine)
- Never jump from coarse to fine grits—this leaves deep scratches that fine grits can’t remove. Follow a “step-down” process:
-
- Mechanical Polishing: 120 grit → 240 → 400 → 800 → 1500 → 3000.
-
- Ultrasonic Polishing: 10μm slurry → 5μm → 1μm.
- Craftsman’s Tip: For aluminum, use a “cross-sanding” technique—sand at 45° to the previous grit’s direction. This ensures you remove all scratches from the coarser grit. I do this for EV trim parts—results in a mirror finish.
Step 4: Precision Monitoring (Don’t Guess—Measure)
- Check Ra regularly with a surface roughness tester (portable units work for most parts). Stop when you hit the target—over-polishing removes too much material.
-
- Example: We polished titanium aerospace brackets to Ra 0.1μm. After 5 minutes of mechanical polishing, Ra was 0.12μm—we stopped, saving material and time.
- Check dimensions with a micrometer every 10 minutes. For a 5mm-diameter shaft, we aim to keep it above 4.995mm (0.005mm material removal max).
Step 5: Post-Polish QA (Clean + Verify)
- Final Clean: Remove polishing compound/slurry with solvent (isopropyl alcohol for metals, acetone for plastics). Residue can cause corrosion (on steel) or discoloration (on aluminum).
- Functional Testing: For critical parts:
-
- Medical implants: Test biocompatibility (ISO 10993).
-
- Automotive parts: Test friction (using a tribometer).
-
- Aerospace parts: Test air resistance (wind tunnel for large parts).
- Visual Inspection: Check for scratches, burn marks, or uneven finish under bright light. A good polish should look uniform—no “shiny spots” or dull areas.
Common Polishing Problems & Solutions (Lessons from the Shop Floor)
Every polisher has horror stories: a part polished too thin, a surface covered in scratches, a batch ruined by chemical burn. Below are the most frequent issues—and how to fix them.
1. Over-Polishing (Part Dimensions Go Out of Spec)
- Cause: Polishing too long or using too aggressive grits (e.g., 80-grit on a thin aluminum part). I once polished a 0.5mm-thick aluminum sensor cover with 120-grit sandpaper—it became 0.45mm thick (out of the 0.48-0.52mm spec).
- Solution:
-
- Set a strict time limit (e.g., 2 minutes per grit for thin parts).
-
- Use a “stop gauge”—attach a small piece of the same material to the part; when the gauge is polished down to a marked line, stop.
-
- For the sensor cover, we switched to 400-grit sandpaper and polished for 1 minute—final thickness: 0.49mm (within spec).
2. Surface Scratches (Even After Fine Polishing)
- Cause: Dirty tools (grit trapped in a buffing wheel), skipping grit steps, or using contaminated slurry. We once had a batch of steel brackets with 0.8μm scratches—turned out the wool wheel had 120-grit debris from a previous job.
- Solution:
-
- Clean tools between grits (wire brush for sanding belts, solvent for buffing wheels).
-
- Never skip a grit (e.g., 240 → 800 skips 400, leaving 240-grit scratches).
-
- Use fresh slurry for ultrasonic polishing—reused slurry has large debris.
3. “Orange Peel” Finish (Wavy Surface on Aluminum)
- Cause: Too much pressure during mechanical polishing (stretching the aluminum’s surface) or buffing wheel 转速 (speed) too high (10,000rpm+). We saw this on EV trim parts—high-speed buffing created a wavy, orange-peel look.
- Solution:
-
- Reduce pressure (let the tool do the work—don’t press hard).
-
- Lower buffing wheel speed (1500-3000rpm for aluminum).
-
- For the EV trim, we switched to a 2000rpm speed and light pressure—orange peel disappeared, and the finish was mirror-smooth.
4. Chemical Burn (Discolored Spots on Steel)
- Cause: Leaving parts in electrolytic/chemical polish too long, or uneven current distribution (electrolytic). We had stainless steel medical tools turn brown—they sat in the acid bath 5 minutes too long.
- Solution:
-
- Set a timer (use a stopwatch, not guesswork).
-
- For electrolytic polishing, ensure the part is fully submerged and the cathode is positioned evenly.
-
- For burned steel, light mechanical polishing (1500-grit) can remove discoloration—just be careful not to alter dimensions.
Industry Applications: Where Polishing Makes or Breaks a Part
Polishing isn’t a “nice-to-have”—it’s critical for parts to function, comply with regulations, and meet customer expectations. Below are the three industries where it matters most.
1. Medical Industry (Biocompatibility + Safety)
- Key Parts: Hip/knee implants (titanium), surgical tools (stainless steel), insulin pump housings (PEEK).
- Requirements: Ra ≤ 0.05μm (prevents tissue irritation), biocompatible (no polishing residues), and smooth enough for sterilization (rough surfaces trap bacteria).
- Polishing Method: Electrolytic (for implants), ultrasonic (for tool cavities).
- Example: A titanium knee implant polished to Ra 0.02μm integrates with bone 30% faster than a Ra 0.1μm implant (Source: Orthopedic Device Journal 2025).
2. Automotive Industry (Friction Reduction + Aesthetics)
- Key Parts: Engine pistons (aluminum), transmission gears (steel), EV trim (aluminum).
- Requirements: Ra ≤ 0.2μm (reduces friction/fuel consumption) for engine parts; mirror finish (Ra ≤ 0.08μm) for aesthetic trim.
- Polishing Method: Mechanical (for pistons/trim), chemical (for plastic housings).
- Craftsman’s Insight: “We polish aluminum EV pistons to Ra 0.1μm. This reduces friction between the piston and cylinder wall—clients report a 5% improvement in battery range. For trim parts, we go to Ra 0.05μm—mirror finish makes the car look premium.”
3. Aerospace Industry (Aerodynamics + Durability)
- Key Parts: Turbine blades (Inconel), landing gear components (steel), avionics housings (aluminum).
- Requirements: Ra ≤ 0.1μm (minimizes air resistance), smooth surfaces (prevents corrosion in high-altitude moisture), and no sharp edges (reduces stress concentration).
- Polishing Method: Ultrasonic (for turbine blades), electrolytic (for landing gear).
- Fun Fact: A 0.1μm Ra turbine blade uses 2% less fuel than a 0.5μm Ra blade—over a plane’s 20-year life, that’s $500,000 in savings (Source: Aerospace Efficiency Report 2025).
Q&A: Wisdom from a CNC Part Polisher
These are the questions I get asked most—from new polishers to clients ordering critical parts. Each answer comes from years of making mistakes and getting it right.
Q1: “I’m new to polishing—what’s the easiest technique to start with?”
- My Answer: Mechanical polishing with aluminum. Aluminum is soft, easy to sand, and forgiving (you can fix small scratches with finer grits). Start with a simple flat part (e.g., an aluminum bracket) and follow the grit sequence: 120 → 240 → 400 → 800. Use a sanding block (not your hand) to keep pressure even—this avoids uneven finishes. I still practice on aluminum scrap when testing new tools!
Q2: “How do I polish a CNC part with threaded holes without ruining the threads?”
- My Answer: Cover the threads first! Use heat-resistant tape (for mechanical polishing) or plastic thread protectors (for chemical/electrolytic polishing). For a recent batch of stainless steel bolts, we put plastic caps on the threads before electrolytic polishing—threads stayed sharp, and the rest of the bolt got a smooth finish. If you accidentally polish threads, use a thread chaser (a tool that cleans up threads without removing material) to fix them.
Q3: “What’s the difference between Ra and Rz—and which one matters for my part?”
- My Answer: Ra (Arithmetic Mean Deviation) is the average roughness—most common for general parts (e.g., automotive pistons). Rz (Maximum Height of Profile) measures the tallest peak to the deepest valley—critical for parts where “extremes” matter (e.g., medical implants, where a single sharp peak can irritate tissue). Ask your client: If they say “Ra 0.1μm,” use a standard roughness tester. If they say “Rz 0.5μm,” make sure your tester can measure Rz (most portable ones do).
Q4: “Can I polish a CNC part too much?”
- My Answer: Absolutely! Over-polishing removes material, which can put the part out of tolerance. I once polished a titanium sensor pin from 3mm to 2.99mm—out of the 2.995-3.005mm spec. The client rejected the batch. Now, I measure dimensions before and after each polishing step. A good rule: For parts with tight tolerances (±0.005mm), limit material removal to 0.002mm max. For non-critical parts (±0.01mm), you can go up to 0.005mm.
Final Thought
CNC part polishing is not merely a pursuit of visual appeal; it’s the linchpin in the transformation of a precisely machined component into a high-performance masterpiece. From medical implants that restore mobility to aerospace blades that safeguard flight, this meticulous process is the key to unlocking enhanced functionality, safety, and reliability.
Polishing CNC parts is a labor of love that demands unwavering patience. Hastily progressing through grits, applying excessive pressure, or taking shortcuts can easily mar the part, undoing hours of precise machining. Seasoned polishing experts understand the importance of a measured approach, regularly assessing progress and tailoring their techniques to the specific requirements of each component.
We invite you to share your unique CNC polishing challenges or inquire about material-specific techniques in the comments section below. Let’s collaborate and elevate your next project to new heights of excellence.