Aluminum CNC Machining Operation Manual

1. Preparations (10 Minutes)

  1. Drawing Confirmation
    • Check dimensions: Focus on red-marked areas (e.g., ±0.02mm tolerance), hole positions/groove depths (avoid missing features).
    • Check surface requirements: Need mirror finish (Ra0.8 or lower)? Burr-free (0.1mm radius on sharp corners)?
    • Note material grade: 6061 (common, easy to machine); 7075 (harder, adjust parameters slightly).
  2. Equipment Check
    • Choose machine: Small parts → vertical mill; long rods → lathe; thin sheets → mill with vacuum chuck.
    • Check cooling: Fill with aluminum-specific coolant (5%-8% concentration, anti-adhesion). Test pump to ensure nozzles aim at the cutting area.
    • Check spindle: Idle for 30 seconds – listen for smooth, no abnormal noise. Apply lubricant to guide rails.

2. Workpiece Clamping (5 Minutes – Preventing Deformation is Key)

  1. Choose Fixture
    • Cylindrical parts: 3-jaw chuck. Wrap jaws with 0.3mm thick rubber (to avoid clamping marks).
    • Square/plate parts: Vise. Place aluminum sheets on jaws (soft enough to avoid crushing the workpiece).
    • Thin sheets (<3mm): Vacuum chuck (adjust suction to 0.4-0.6MPa, avoid warping).
  2. Clamping Steps
    • Place workpiece stably, hand-tighten the fixture (don’t over-tighten).
    • Align with dial indicator (deviation ≤0.01mm), then tighten gradually (torque: 20-30N·m for 6061; add 5N·m for 7075).
    • Wiggle the workpiece to confirm no looseness (critical! Aluminum is soft – looseness causes burrs).

3. Tool Selection & Installation (3 Minutes – Sharpness First)

  1. Tool Choice
    • Milling (flat surfaces/profiles): Carbide end mill (4-flute, helix angle 30°-45°, polished cutting edge, anti-aluminum adhesion).
    • Drilling: Parabolic flute drill (good chip evacuation; HSS for Φ5mm or smaller).
    • Tapping: Spiral flute tap (ejects aluminum chips, avoids thread damage).
  2. Tool Installation
    • Clean the tool holder. Tool overhang = machining depth + 10mm (too long causes vibration).
    • Tighten the collet with a wrench (moderate force to avoid chipping). Manually rotate the spindle to check concentricity (runout ≤0.02mm).

4. Cutting Parameter Setup (2 Minutes – Fill by Material Grade)

Machining Type 6061 (Carbide Tool) 7075 (Carbide Tool)
Milling 1500-3000 RPM, 200-500 mm/min feed, 1-5mm depth 1200-2500 RPM, 150-400 mm/min feed, 1-3mm depth
Drilling 800-1500 RPM, 50-100 mm/min feed 600-1200 RPM, 40-80 mm/min feed
Tapping (M6) 100-200 RPM (manual feed is steadier) 80-150 RPM

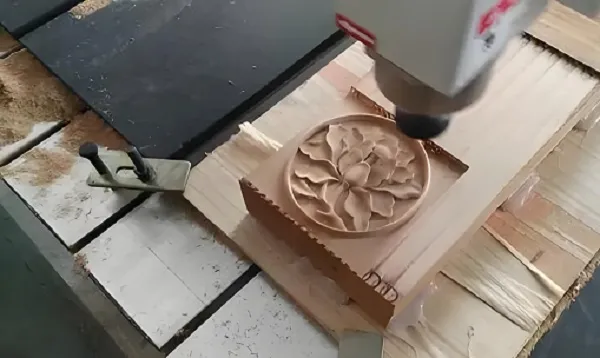
5. Programming & Tool Setting (10 Minutes – Avoid Mistakes!)

  1. Programming
    • Software: Use Mastercam’s “aluminum machining” template (auto-optimizes chip evacuation paths).
    • Toolpath: Leave 0.1mm finish allowance. Add arc transitions at corners (avoids vibration at sharp angles).
    • Simulation: Check for collisions with fixtures/worktable and over-cutting (aluminum is soft – over-cutting ruins parts).
  2. Tool Setting
    • Z-axis: Lightly touch tool tip to workpiece top, set Z=0 on screen (don’t press hard – it will dent aluminum).
    • X/Y-axis: Use edge finder to touch workpiece edges, record coordinates (repeat twice, error ≤0.01mm).
    • After entering coordinates, manually move tool to safe position (≥50mm from workpiece).

6. Test Cutting & Machining (Depends on Quantity – First Piece Must Be Checked)

  1. Test Cutting
    • Enable “single block mode,” cut 1-2mm deep, then stop the machine.
    • Measure dimensions (with calipers/micrometers) and check surface (no adhesion/build-up or burrs).
    • Adjust parameters if needed: Adhesion → increase coolant/spindle speed; undersize → offset Z-axis by 0.05mm.
  2. Formal Machining
    • Start continuous run, stand by emergency stop button. Observe:
      • Chips: Silver-white (normal); black → stop! (Likely overheating/low coolant).
      • Sound: “Sizzling” (good); “thudding” → stop! (Likely loose tool).
    • Clean aluminum chips every 30 minutes (use a brush, not hands – chips are sharp).

7. Finishing & Inspection (5 Minutes per Piece)

  1. Unloading:Loosen fixture slowly (avoid workpiece flying off). Hold with a soft cloth (avoid fingerprints).
  2. Inspection
    • Dimensions: Focus on tolerance areas (e.g., hole spacing, height) – pass only if within tolerance.
    • Surface: Feel by hand (burr-free); check reflection (no scratches).
  3. Fixing Defects
    • Over-dimension: Check tool setting records/program coordinates.
    • Poor surface: Replace with sharp tool, increase coolant.

8. Final Tasks (3 Minutes)

  • Turn off machine → clean aluminum chips (use chip extractor) → store tools (oil for rust prevention).
  • Record parameters: Write qualified speed/feed on the drawing (for next use).
Key Reminder:Aluminum is soft and prone to adhesion – keep coolant running. Don’t over-clamp – deformation is irreversible!

Disclaimer

  1. All information, opinions, and data contained in this article are for the purpose of information transmission only and do not constitute any advice on investment, transactions, law, medical care, or other matters.
  1. The content of the article is compiled based on public information or created based on the author’s personal understanding. Although every effort is made to ensure accuracy, it does not guarantee the completeness, accuracy, and timeliness of the information, nor does it bear any responsibility for any losses caused by the use of the content of this article.
  1. If the article involves third-party opinions, pictures, data, and other content, the copyright belongs to the original author. In case of infringement, please contact us for deletion.
  1. Readers should make independent decisions based on their actual situation and combined with professional opinions. The user shall bear all consequences arising from the use of the content of this article.

Recommended Reading