Core Cognition: Sandwich Injection Molding—More Than “Two-Layer Plastic”
When you hold a car door panel, a laptop bottom case, or a household appliance handle, there’s a good chance it’s made with sandwich injection molding. This process doesn’t just shape plastic—it reinvents it: a thin, high-quality “skin” layer (for appearance, durability) wraps around a cost-effective “core” layer (often recycled plastic or filler-reinforced material). It’s the manufacturing equivalent of a well-made sandwich: crusty, flavorful bread (skin) + hearty, affordable filling (core)—no compromise on taste or value.

At its heart, sandwich injection molding solves a universal problem: How to make parts that look good, perform well, and don’t break the bank. Traditional injection molding uses 100% virgin material for every part—expensive, and wasteful. Sandwich molding cuts costs by 20-35% (Source: 2025 Sustainable Plastics Manufacturing Report) and slashes plastic waste by up to 40% (by using recycled core materials). But here’s the secret only those who’ve run the machines know: It’s not just about “mixing cheap and expensive plastic.” It’s about understanding how the two layers talk to each other—their compatibility, their flow, their bond. A bad sandwich mold job? The skin peels off, the core bubbles, the part feels cheap. A good one? You’d never know there’s a recycled core inside—until you see the cost savings.
Industry adoption tells the story: 65% of automotive interior parts (door panels, armrests) use sandwich molding; 40% of consumer electronics cases rely on it (Source: Global Injection Molding Trends 2025). For these sectors, “good enough” isn’t enough—a car part needs to resist scratches (skin layer) and absorb impact (core layer); a laptop case needs to look sleek (skin) and be lightweight (core). Sandwich molding delivers all three.
Core Process: The “Recipe” for a Perfect Sandwich Part
Sandwich injection molding is a dance of timing, temperature, and material flow. It’s not just “inject twice”—it’s knowing when to switch from skin to core, how hard to push the plastic, and how to make sure the two layers stick like glue. Below is the step-by-step breakdown, with the craftsman’s insights they don’t put in textbooks.
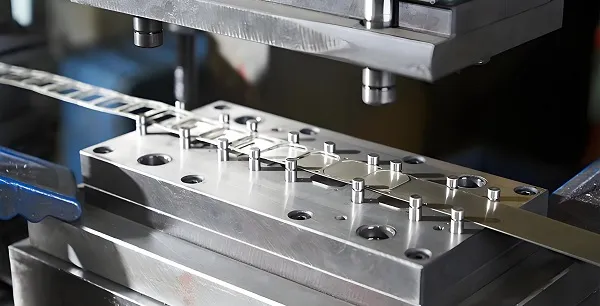
Step 1: Mold Preparation—The “Baking Pan” Matters
- What It Does: The mold must be designed to handle two material flows without mixing or leaking. Key features:
-
- Dual Gates: One for skin material, one for core (or a single “co-injection” gate that switches materials).
-
- Exhaust Vents: Critical—trapped air causes bubbles in the core or gaps between skin and core. Vents should be 0.01-0.02mm thick (thin enough to keep plastic in, thick enough to let air out).
-
- Surface Finish: The skin-side cavity needs polishing (Ra 0.4-0.8μm) for a smooth appearance; the core side can be rougher (Ra 1.6μm)—no one will see it.
- Craftsman’s Insight: “I once ran a batch of laptop cases with a mold that had clogged exhaust vents. The core layer trapped air, and every part had a bubble the size of a pea. I spent 2 hours cleaning the vents with a 0.01mm wire brush—after that, not a single bubble. Molds aren’t just metal—they’re breathing tools.”
Step 2: Material Preparation—Choose Complementary “Ingredients”
- What It Does: Skin and core materials must be compatible (same base polymer, similar melting points) to bond. Mixing incompatible materials (e.g., ABS skin + PP core) is a disaster—they’ll peel apart like oil and water.
- Common Material Pairs (proven to work):
|
Application
|
Skin Layer Material
|
Core Layer Material
|
Reasoning
|
|
Car Interior Panels
|
TPO (Shore A 85)
|
TPO + 15% Recycled TPO + 10% Talc
|
TPO is flexible (skin resists scratches); recycled TPO + talc cuts cost and adds rigidity.
|
|
Laptop Cases
|
ABS (High-Gloss)
|
ABS + 20% Recycled ABS + 5% Glass
|
High-gloss ABS looks sleek (skin); recycled ABS + glass reduces weight and cost.
|
|
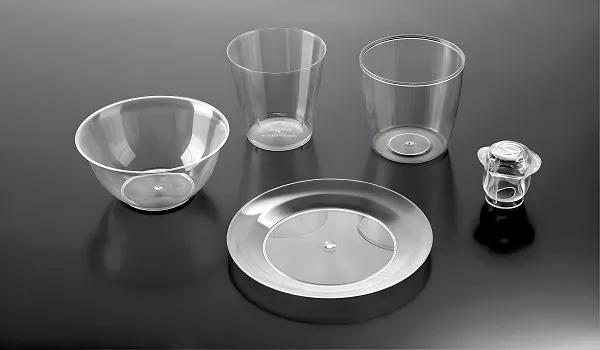
Household Containers
|
PP (Food-Grade)
|
PP + 30% Recycled PP
|
Food-grade PP (skin) meets safety standards; recycled PP (core) cuts waste.
|
- Craftsman’s Insight: “A client once asked me to use a PP skin with a PE core—they thought ‘plastic is plastic.’ I tested a sample: after 1 week in sunlight, the skin peeled off. I convinced them to switch to PP core—now their containers last 2 years. Compatibility isn’t a suggestion; it’s a rule.”
Step 3: Injection—The “Layer Dance”
This is where the magic happens: two materials, one mold, no mixing. The process has two variants—sequential injection (skin first, then core) and co-injection (both materials inject simultaneously, with skin wrapping core). Sequential is more common for beginners—it’s easier to control.
- Sequential Injection Steps:
-
- Inject Skin Layer: Fill 15-30% of the mold cavity with skin material (e.g., 0.5mm skin for a 3mm-thick part). Keep injection speed slow (30-50mm/s) to avoid turbulence—turbulence causes the skin to thin unevenly.
-
- Switch to Core Layer: As soon as the skin covers the cavity walls, inject core material. The core pushes the skin outward to fill the rest of the cavity (70-85% volume). Core speed should be 10-20% slower than skin (to avoid breaking the skin).
-
- Hold Pressure: Apply 80-100MPa hold pressure for 5-10 seconds—this squeezes out air and ensures the core bonds to the skin.
- Craftsman’s Insight: “I messed up the skin-core switch time once with car armrests. I waited too long to inject core— the skin cooled and hardened, so the core couldn’t push it out. Every part had a thin spot on the edge. Now I use a mold sensor to tell me when the skin is ready—switch time is down to ±0.1 seconds. No more thin spots.”
Step 4: Cooling & Demolding—Patience Pays Off
- What It Does: Sandwich parts need longer cooling than single-layer parts— the two layers cool at different rates (skin often cools faster than core). Cool too fast, and the part warps; too slow, and you waste time.
-
- Cooling Time: 10-20% longer than single-layer (e.g., 20 seconds for a single-layer PP part → 24 seconds for sandwich PP).
-
- Mold Temperature: Keep skin-side mold at 60-80℃ (for smooth surface); core-side can be 10℃ lower (50-70℃) to speed cooling.
- Craftsman’s Insight: “I tried to rush cooling on a batch of ABS laptop cases—cut it from 25 to 20 seconds. The parts warped so bad they wouldn’t fit a laptop. I learned: cooling time isn’t ‘dead time’—it’s ‘quality time.’ Now I set a timer and don’t open the mold early, no matter how busy I am.”
Core Technologies: The “Secrets” to Consistent Quality
Anyone can inject two layers of plastic—but making 1000 identical sandwich parts? That takes technology. Below are the tools and tricks that turn “hit-or-miss” into “perfect every time.”
A. Co-Injection Nozzles: The “Traffic Cop” for Materials
- How It Works: A special nozzle with two channels (one for skin, one for core) switches between materials without mixing. Advanced nozzles have a “shut-off pin” that blocks the skin channel when core injects—no backflow.
- Why It Matters: Without a good co-injection nozzle, skin and core mix at the gate (called “streaking”). I once used a cheap nozzle that leaked skin material into the core—every part had a ugly white streak. Switched to a brand-name co-injection nozzle (with a shut-off pin)—streaks gone.
- Key Spec: Look for nozzles with “material compatibility” (e.g., PEEK-compatible for high-temperature plastics) and easy cleaning (no hard-to-reach channels).
B. Process Monitoring: The “Guardian” of Layers
- How It Works: Sensors in the mold track:
-
- Skin Thickness: Ultrasonic sensors measure skin depth (ensure it’s 15-30% of total thickness).
-
- Injection Pressure: Pressure sensors alert you if core pressure is too high (risk of skin breakage) or too low (risk of air gaps).
-
- Temperature: Thermocouples monitor mold temperature (keep skin-side within ±2℃ of setpoint).
- Craftsman’s Insight: “Monitoring saved me during a 500-part run of car door panels. The sensor noticed the skin thickness dropping to 10% (too thin)—turned out the skin material feed was clogged. I fixed it in 5 minutes—saved 400 parts from being scrap. Sensors aren’t just ‘extra cost’—they’re insurance.”
C. Bond Strength Testing: The “Final Taste Test”
- How It Works: You can’t see if skin and core are bonded—you have to test it. Common methods:
-
- Cross-Cut Test: Score the skin in a 1mm×1mm grid (cross-hatch), apply adhesive tape, and pull. No skin peeling = good bond (automotive standard: 0 级 bond—no removal).
-
- Impact Test: Drop the part from 1m (for consumer parts) or 2m (for automotive parts). If the skin stays attached, it’s good.
- Craftsman’s Insight: “I once skipped testing a batch of household containers—client said ‘they look fine.’ Two weeks later, they sent them back: the skin peeled off when someone lifted the lid. Now I test 5 parts from every batch—cross-cut and impact. No more surprises.”
Practical Case: Making 500 TPO Car Armrest Covers
Let’s walk through a project I did last quarter: 500 TPO car armrest covers for a local auto parts supplier. The part was 150×80×10mm (3mm thick), with a matte finish (skin) and impact-resistant core. This wasn’t just “molding parts”—it was making something that would be touched by drivers every day.
Step 1: Prep—Respect the Materials
- Skin Material: TPO (Shore A 85, matte finish)—needs drying (60℃ for 2 hours, to remove moisture; wet TPO causes surface defects).
- Core Material: TPO + 15% recycled TPO + 10% talc—dried at 55℃ for 1.5 hours (recycled material often has more moisture).
- Mold: 2-cavity mold (to speed production), with co-injection nozzle, exhaust vents (0.015mm), and ultrasonic skin-thickness sensors. Mold temperature: skin-side 70℃, core-side 60℃.
Step 2: Set Parameters—Trial and Error (Mostly Error at First)
- First Test Run:
-
- Skin injection: 40mm/s speed, 75MPa pressure, fill 25% cavity (0.75mm skin).
-
- Core injection: 35mm/s speed, 70MPa pressure, fill remaining 75%.
-
- Cooling time: 22 seconds.
- Problem: Core pushed too hard—skin broke at the edges (thin spots).
- Fix: Reduced core speed to 30mm/s, core pressure to 65MPa. Second test run: perfect edges.
Step 3: Production—Steady as She Goes
- Run 500 Parts: Check every 20 parts for:
-
- Skin thickness (0.7-0.8mm, via sensor).
-
- Surface defects (no scratches, no bubbles).
-
- Bond strength (cross-cut test on 1 part every 50).
- Hiccup: Halfway through, skin material feed slowed—skin thickness dropped to 0.5mm. Fixed by cleaning the feed hopper (it had a TPO pellet clog).
- Result: 495 good parts (99% yield)—client said they were “better than the virgin-plastic ones we used before.”
Step 4: Delivery—Pride in the Process
When I handed over the armrests, the supplier’s engineer ran his finger over the matte finish and said, “You can’t even tell there’s recycled plastic inside.” That’s the goal of sandwich molding: to make sustainability feel invisible—to deliver quality that doesn’t scream “cheap core.”
Common Nightmares (and How to Wake Up)
Every injection molder has horror stories about sandwich parts—skin peeling, core bubbling, parts warping. But these aren’t failures—they’re lessons in what not to do. Here are the ones I’ve learned the hard way.
1. Skin-Core Delamination (Peeling)
- Cause: Incompatible materials, or mold temperature too low (skin cools before core bonds). I had this happen with ABS skin + PP core—they peeled like a banana.
- Solution: Use same-base materials (ABS skin + ABS core); increase mold temperature by 5-10℃ (skin-side to 75℃ for ABS). For the ABS-PP mistake, I switched to ABS core—no more peeling.
2. Core Penetration (Core Shows Through Skin)
- Cause: Core injection speed/pressure too high, or skin layer too thin. I once had core penetrate the skin on car panels—core material (with talc) showed through as gray spots.
- Solution: Reduce core speed by 10-15%, core pressure by 5-10MPa; increase skin layer to 30% of total thickness (e.g., 0.9mm skin for 3mm part). The gray spots disappeared.
3. Surface Bubbles (Skin Layer)
- Cause: Moisture in skin material, or mold vents clogged. I had this with PP skin—bubbles looked like tiny blisters.
- Solution: Dry skin material longer (PP: 80℃ for 3 hours instead of 2); clean mold vents with a fine wire brush. Bubbles were gone in the next run.
4. Part Warping (Uneven Shape)
- Cause: Uneven cooling (core cools slower than skin), or uneven skin thickness. My laptop cases warped because the core-side mold was 10℃ colder than skin-side.
- Solution: Balance mold temperature (core-side within 5℃ of skin-side); ensure skin thickness is consistent (use ultrasonic sensors). Warping dropped from 2mm to 0.5mm (within spec).
Q&A: Wisdom from the Mold Shop
These are the questions I get asked most—from beginners just starting with sandwich molding to seasoned molders looking to fix old problems.
Q1: “I’m a beginner—what’s the easiest material pair to start with?”
- My Answer: PP-PP (polypropylene skin + polypropylene core). PP is forgiving: low melting point (160-180℃), easy to dry, and bonds to itself perfectly. I started with PP food containers—zero delamination, few bubbles. Avoid ABS or TPO first—they’re more sensitive to temperature.
Q2: “How do I decide the skin-core ratio? 15% skin or 30%?”
- My Answer: Ask two questions: (1) Does the part need a tough skin (e.g., car armrest)? Go 25-30% skin. (2) Is cost the top priority (e.g., storage bins)? Go 15-20% skin. A good rule: skin should be thick enough to cover the mold’s surface (hides core defects) but thin enough to save money. For 3mm parts, I usually do 0.75mm skin (25%)—balance of quality and cost.
Q3: “Can I use 100% recycled plastic for the core?”
- My Answer: Sometimes—but test first. Recycled plastic can have impurities (dirt, other plastics) that weaken the core or cause bubbles. I use up to 30% recycled for automotive parts (they need strength); 50% for non-load-bearing parts (storage bins). Always run a test part with 100% recycled core—if it passes impact and bond tests, go for it. If not, mix in virgin plastic (e.g., 70% recycled + 30% virgin).
Q4: “What’s the biggest mistake I should avoid?”
- My Answer: Skipping material drying. Wet plastic is the enemy of sandwich molding—it causes bubbles in the skin, poor bond, and surface defects. I once thought “PP is dry enough” and skipped drying—wasted 100 parts. Now I use a moisture analyzer to check material before running—if it’s over 0.1% moisture, it goes back in the dryer. Drying isn’t a step to skip; it’s the first step to success.
Final Thought
Sandwich injection molding isn’t about cutting corners—it’s about cutting waste. It’s about making parts that look good, work well, and don’t cost the earth. Every time I run a sandwich mold job, I think about the recycled plastic in the core—plastic that would have ended up in a landfill, now part of a car door or a laptop case. That’s the magic of this process: it turns “less” into “more”—less virgin plastic, more value; less waste, more quality.
At the end of the day, sandwich molding isn’t about machines or materials. It’s about respect—for the customer (delivering quality), for the planet (reducing waste), and for the craft (taking the time to get the layers right). When a client says, “I can’t believe this has recycled plastic,” I know I’ve done my job.
What sandwich part have you always wanted to make? Or what problem have you faced with delamination or core penetration? Share your story in the comments—I’d love to help you find a solution.